Saturday, August 5, 2017

Earn Bitcoins, Ethereum and Cloud Mining for Free

This is a tutorial on how to earn bitcoins for free, however, you have to spend some time to earn them. 

Assumption: You have basic knowledge of bitcoins and you have your bitcoin wallet. 

DISCLAIMER: The author is not associated with EOBOT nor owns anything or part of the application. All the features are on the EOBOT's copyright properties and the author only took screenshots of some of the parts of the website for instructional purposes. The author only shows how to use EOBOT and would not be responsible for any loss on the usage of the application incurred both by the reader and EOBOT.


1. Signup in EOBOT. You'll start with 0.
2. On the upper right-hand of the screen, go to Products > Faucet.


3. Do the daily challenges.

4. You'll be rewarded with bitcoins.
5. Login everyday and do the challenges to receive more bitcoins. Logging in daily would also reward you with DogeCoin.
6. Earn as little as 25 DogeCoin (=25 days of logging in) and you can exchange it to a cloud mining server. More DogeCoin = more cloud hash power.

Exchanging DogeCoin to Cloud Mining hash power
7. Go to Products > Cloud Mining
8. Select "Buy using Cryptocurrency".

9. Select DogeCoin from the dropdown, and "Buy Cloud SHA-256 4.0 5 Year Rental".

Voila! You now have bitcoins and cloud hash to use for mining. You can also do the same for Ethereum. Just select Ethereum from the dropdown.


Or why not choose diversify and rotate on the cryptocurrencies you want to mine every 10 minutes.


Enjoy Mining!

At the time of writing, buying of bitcoins/hashpower in EOBOT is currently suspended. If you want faster turnaround, you can buy cloud hash power in other suppliers, like Genesis Mining. Genesis Mining Promo Code (3% off): mY8itb


Saturday, March 15, 2014

Mule REST on Tomcat (via Jersey)

I. Dependencies
  1. Mule server libraries (Mule standalone 3.3.x or later)
  2. Tomcat
  3. Eclipse (any IDE capable of the same)
II. Prerequisites
  1. Install Mule on Tomcat
  2. Create a Dynamic Web Application project in Eclipse and set Tomcat as deploy server
III. Design


IV. Service Class
 package com.seralde.rest.service;


import javax.ws.rs.GET;
import javax.ws.rs.Path;
import javax.ws.rs.PathParam;
import javax.ws.rs.Produces;
import javax.ws.rs.core.MediaType;
import javax.ws.rs.core.Response;

import com.seralde.rest.entity.SampleEO;

@Path("/")
public class HelloWorldService {
   @GET
   public Response defaulMethod(){


      String output = "Hello World!";


      return Response.status(200).entity(output).build();
   }


   @GET
   @Path("/echo/{param}")
   public Response getMsg(@PathParam("param") String msg) {


      String output = "Hello " + msg + "!";


      return Response.status(200).entity(output).build();
   }


   @GET
   @Path("/eo")
   @Produces(MediaType.APPLICATION_JSON)
   public SampleEO getEO() {
      SampleEO eo = new SampleEO();
      eo.setAge(10);
      eo.setName("Juan dela Cruz");
      return eo;
   }


}

V. Entity/Model Class
 package com.seralde.rest.entity;


public class SampleEO {
   private String name;
   private int age;


   public String getName() {
      return name;
   }
   public void setName(String name) {
      this.name = name;
   }
   public int getAge() {
      return age;
   }
   public void setAge(int age) {
      this.age = age;
   }
}

VI. Mule Config
<?xml version="1.0" encoding="UTF-8"?>

<mule xmlns:json="http://www.mulesoft.org/schema/mule/json" xmlns:core="http://www.mulesoft.org/schema/mule/core" xmlns:jersey="http://www.mulesoft.org/schema/mule/jersey" xmlns:http="http://www.mulesoft.org/schema/mule/http" xmlns="http://www.mulesoft.org/schema/mule/core" xmlns:doc="http://www.mulesoft.org/schema/mule/documentation"
   xmlns:spring="http://www.springframework.org/schema/beans"
   xmlns:servlet="http://www.mulesoft.org/schema/mule/servlet"
   xmlns:xsi="http://www.w3.org/2001/XMLSchema-instance"
   xsi:schemaLocation="http://www.mulesoft.org/schema/mule/core       http://www.mulesoft.org/schema/mule/core/current/mule.xsd
http://www.springframework.org/schema/beans    http://www.springframework.org/schema/beans/spring-beans-current.xsd
http://www.mulesoft.org/schema/mule/http    http://www.mulesoft.org/schema/mule/http/current/mule-http.xsd
http://www.mulesoft.org/schema/mule/jersey    http://www.mulesoft.org/schema/mule/jersey/current/mule-jersey.xsd
http://www.mulesoft.org/schema/mule/json    http://www.mulesoft.org/schema/mule/json/current/mule-json.xsd
http://www.mulesoft.org/schema/mule/servlet    http://www.mulesoft.org/schema/mule/servlet/current/mule-servlet.xsd">


   <spring:beans>
      <spring:import resource="classpath:sampleRestAppContext.xml"/>
   </spring:beans>


   <flow name="restappFlow1" doc:name="restappFlow1">


   <servlet:inbound-endpoint path="restService" responseTimeout="10000"     doc:name="Servlet"/>


   <jersey:resources doc:name="REST">
      <!--<component class="com.seralde.rest.HelloWorldService"/> -->
      <component>
         <spring-object bean="helloWorldService"/>
      </component>
   </jersey:resources>
   </flow>
</mule>

VII. Spring Context
<?xml version="1.0" encoding="UTF-8"?>

<beans xmlns="http://www.springframework.org/schema/beans"
xmlns:aop="http://www.springframework.org/schema/aop"
xmlns:context="http://www.springframework.org/schema/context"
xmlns:tx="http://www.springframework.org/schema/tx"
xsi:schemaLocation=" http://www.springframework.org/schema/aop    http://www.springframework.org/schema/aop/spring-aop-3.1.xsd
http://www.springframework.org/schema/beans    http://www.springframework.org/schema/beans/spring-beans-3.1.xsd
http://www.springframework.org/schema/context    http://www.springframework.org/schema/context/spring-context-3.1.xsd
http://www.springframework.org/schema/tx    http://www.springframework.org/schema/tx/spring-tx-3.1.xsd"
xmlns:xsi="http://www.w3.org/2001/XMLSchema-instance">


<bean id="helloWorldService" class="com.seralde.rest.service.HelloWorldService"/>
</beans>

VIII. WEB.XML

<?xml version="1.0" encoding="UTF-8"?>

<web-app xmlns:xsi="http://www.w3.org/2001/XMLSchema-instance" xmlns="http://java.sun.com/xml/ns/javaee"
xsi:schemaLocation="http://java.sun.com/xml/ns/javaee http://java.sun.com/xml/ns/javaee/web-app_2_5.xsd" id="WebApp_ID" version="2.5">
   <display-name>sample-rest</display-name>


   <context-param>
      <param-name>org.mule.config</param-name>
      <param-value>mule-config-rest.xml</param-value>
   </context-param>
   <listener>
      <listener-class>
        org.mule.config.builders.MuleXmlBuilderContextListener
      </listener-class>
   </listener>
   <servlet>
      <servlet-name>muleServlet</servlet-name>
      <servlet-class>
        org.mule.transport.servlet.MuleReceiverServlet
      </servlet-class>
      <load-on-startup>1</load-on-startup>
   </servlet>


   <servlet-mapping>
      <servlet-name>muleServlet</servlet-name>
      <url-pattern>/services/*</url-pattern>
   </servlet-mapping>
</web-app>

IX. DOWNLOAD SAMPLE PROJECT
Download Project HERE

See MuleSoft (Mule ESB)

Saturday, February 2, 2013

How to Make Ubuntu 12.04 a Wi-Fi Hotspot from Your Wired Internet

All credits to Tan Zhijun 谭智军.

Figure 1
Figure 1
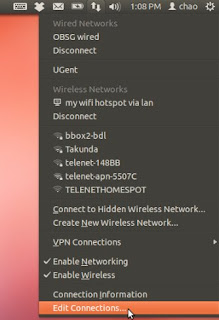
1. Right click network manager on the laptop with wireless hardware (these days most of laptops have wireless modules) and connected with internet by wired network (WLAN), then choose “Edit Connections…”, click it (Figure 1 at left).
Figure 2


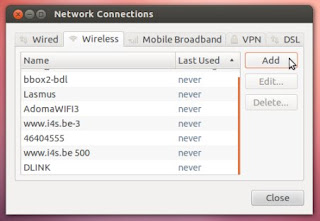
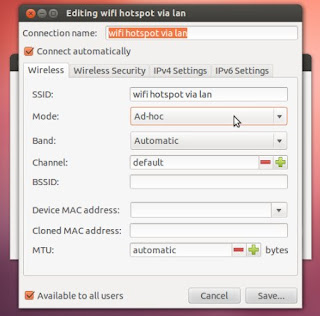
2. Click the menu “Wireless”, and click “Add” button, then fill up the blanks as you like: your “Connection name”, “SSID”, then choose “Mode” option as “Ad-hoc”, for others no need to change, shown as Figure 3.

Figure 3
 
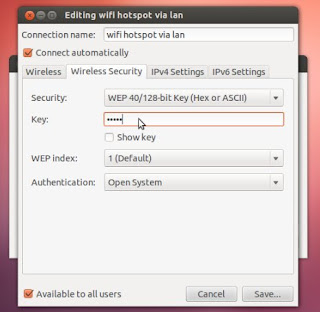
3. The next step is set up your key for the connection, click “Wireless Security”, choose “WEP 40/128-bit Key (Hex or ASCII)”, type your own “Key” if you do not want to make the whole world to share your WIFI, it is better make the length of the key as 5 that I tried successfully (Figure 4).

Figure 4
 
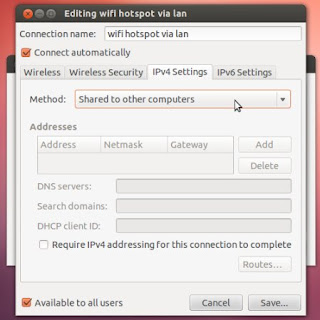
 4. Turn to “IPv4-Settings”, choose the option “Shared to other computers” for “Method”, as shown in Figure 5.

Figure 5


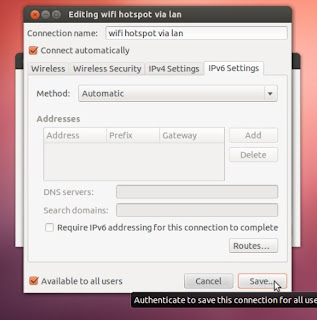
5. Do not make any change for “IPv6 Settings”, OK, click “Save” to finish the setup work, as shown in Figure 6.

Figure 6


original post: http://tumutanzi.tuita.com/blogpost/22968115

Wednesday, December 26, 2012

How to Apply Verified SSL Certificate for Tomcat Using OpenSSL

Before anything else, I suggest that you work all of this in a single directory, something like apache_certs/.

1. Create the CSR (below is an example of generating CSR for http://host.name.com - an actual and existing domain):
openssl req -new -newkey rsa:2048 -nodes -out host_name_com.csr
-keyout host_name_com.key -subj "/C=US/ST=Colorado/L=Denver/O=Name.com
LLC/OU=Test Department/CN=host.name.com"

2. The command above will produce two files : host_name_com.csr and host_name_com.key. You have to submit the contents of host_name_com.csr to the certificate authority, like, DigiCert, VeriSign, CACert, etc. You may use the URL below to validate your csr:
https://ssl-tools.verisign.com/checker/

3. Once the validated certificate has been received, you have to combine the private key and verified certificate into a file as PKCS12 (set password; you may use tomcat's default, 'changeit'):
openssl pkcs12 -export -inkey host_name_com.key 
-in host_name_com.crt -out host_name_com.p12

host_name_com.key = key generated along with the csr host_name_com.crt = certificate received from the certificate authority host_name_com.p12 = the new file that will contain the key and the certificate

4. Add the p12 to your keystore, password should be similar to the one used on #3 (or tomcat's default, 'changeit')
keytool -importkeystore -destalias tomcat -destkeystore keystore.jks 
-srckeystore host_name_com.p12 -srcstoretype PKCS12 -alias 1
keystore.jks = my named keystore, default is ".keystore"

5. Modify tomcat's server.xml under conf folder:
<Connector port="443" protocol="org.apache.coyote.http11.Http11Protocol" 
SSLEnabled="true" keystoreFile="~/apache_certs/keystore.jks"
keystorePass="changeit" maxThreads="150" scheme="https" secure="true"
clientAuth="false" sslProtocol="TLS" />

6. Restart the server. And when you access your applications, you should now see the verified certificate on your site.